
Do you have back and forth rock in your rack and pinion focuser? I did and I fixed it with about $15 worth of parts. The illustrated story, below. At the bottom I have a parts list and step-by-step instructions if you want to do this on your own.
My Celestron C6-NGT is not a big light bucket but it is reasonably portable and that means I can plant my eyeball on her at a moment’s notice. I don’t need to invest a whole evening to enjoy a cup or two of coffee while gazing; I just drag the gear out to the back patio and viola, I’m entertained! The simple design of this Newtonian with a rack and pinion focuser makes the gear accessible, unintimidating and a big hit at parties. At our annual Christmas blowout in 2011 we had a line of people 10 deep for 4 hours waiting to check out Jupiter. For some, this was their first time looking through a “real” telescope.
While my scope gets a lot of use, Celestron did not count on me abusing this equipment when they designed the focuser. After about 10 sessions connecting a digital camera to my scope I began to notice rocker in the focuser draw tube. I must admit that I hung the afocal adapter off my Baader-Hyperion glass hand grenades, wrecking this focuser pretty good, as you will see below. I could calm the movement somewhat by clamping down on the focuser lock but that created more problems. First, it only stopped the movement in the N/S direction. E/W was still full of play unless I really tightened the lock like an animal. Second, this worsening condition effectively meant I could not collimate the scope. There was enough play in the assembly that the centerline of the draw tube moved each and every time I turned the knob. When fully extended the eyepiece was wiggling at the top almost an eighth of an inch from side to side! After 3 nights of blurry vision I decided to fix the focuser myself. Let me take you through the process. If your rack and pinion focuser is anything like mine you should be able to breathe new life into your eye for the sky.
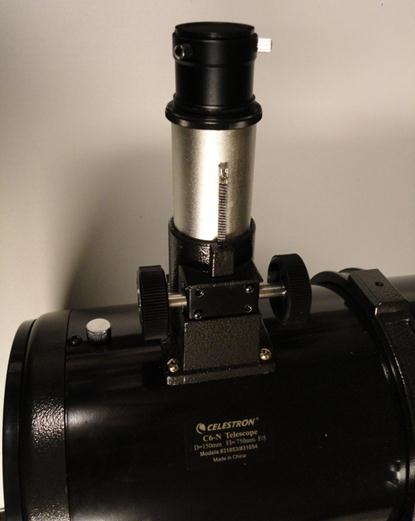
Figure 1: The Culprit, two screws removed
The Story:
Figure 1 shows the focuser almost fully extended and with 2 of 4 screws holding the rack and pinion assembly removed. The silver piece is the draw tube with the rack (the gear teeth screwed to the tube). To remove the draw tube I need to remove those last 2 screws and the knob shaft with the pinion gear attached. That will allow the draw tube to slide out completely. Before we do that, let’s take a peek at just how much play this draw tube has inside the housing. I wouldn’t want you to think I was exaggerating:
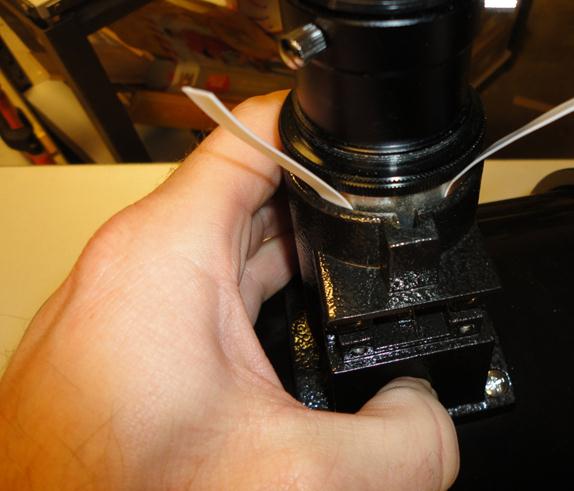
Figure 2: .020″ Shims fit loosely in the gap, but there is even more gap below the housing rim
My concern at this point is growing exponentially. This is a serious problem and I am worried there is just too much damage I cannot see to attempt a repair. The aluminum tubing shows no sign of wear from the outside and the gap at the top of the assembly is a mirage. The “lip” at the top of the housing is about 1/16″ deep and thicker than the rest, meaning the gap is actually wider below the surface than what you can see here. So how the heck did Celestron fit these parts snugly at the factory? To find out I removed the remaining screws, then carefully separated and placed all of the parts in a dust free container. The tricky part was avoiding the thick grease Celestron uses on the gears to minimize slop. It sticks to everything and the grease needs to remain clean.
Now for a look at the inside of the housing:
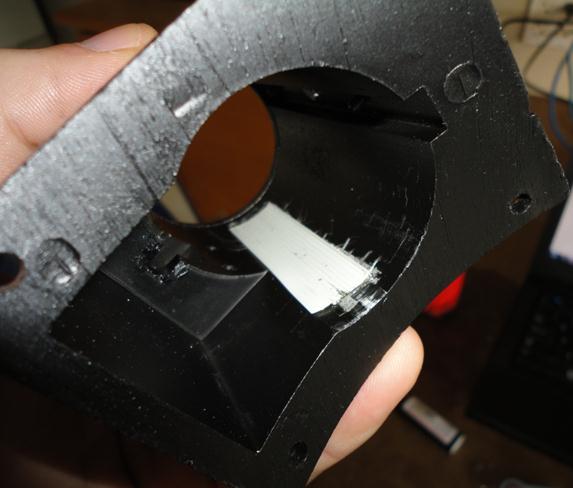
Figure 3: Focuser Housing is Cast Aluminum with 2 Nylon Shims- Only One Visible Here
Bottoms up! Two nylon shims are employed to keep the draw tube centered in the focuser housing. The other one is opposite the shim you can see. A closer look reveals the extent of the problem:
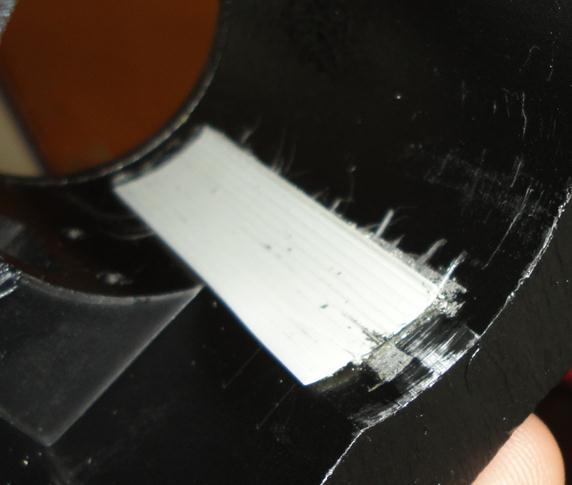
The nylon shims have raised ridges that are nearly worn flat and the bottom of the housing is showing damage where the draw tube is moving laterally in the assembly. This is NOT COOL but it does explain the problem. The solution, however, still eluded me. Understanding WHY Celestron might choose two cheap nylon shims to center the draw tube helped me craft a fix. Ease of assembly and low material costs are only part of the equation. Friction is the enemy Celestron is up against. The draw tube is currently too loose in the housing so I want to tighten the works by reducing the gap between housing and draw tube. But…if there is no tolerance between the draw tube and housing the focuser will be impossibly tight and any material expansion or contraction (heating/cooling) could seize the mechanics completely. These nylon shims have ridges to minimize contact with the draw tube wall, thereby limiting friction, but they are sized thick enough to keep the draw tube reasonably centered in the housing. The problem is, I’ve worn down those ridges and begun to tear into the housing wall.
The solution has to balance smooth operation while minimizing play. Ordering replacement shims was a non-starter; they have already failed once. Why set myself up for failure again with a half-solution?
To find a permanent solution using the proper materials required a call to an expert. I have a buddy, Chris Larsen, who designs spas for these guys. Chris took Mr. McGuire’s exhortations in “The Graduate” seriously when it comes to plastics; the man breathes polymers and can wax poetic about PETE. It took him 5 seconds to solve this one-
Me: HELP!
Chris: I have one word for you. (ha!) Teflon.
Me: Huh? I’m not making eggs here, we’re rebuilding a telescope focuser.
Chris: Consider making eggs on your scope a side benefit. Seriously, get some Teflon/PTFE and then show me some stars. It’s an incredibly durable substance, has a very low coefficient of friction (nothing sticks to it, right?) and has nearly zero deformation with wild temperature swings. All that, and you can buy it in sheets at almost any thickness you need with an adhesive-ready side.
Chris directed me to his favorite supplier, McMaster-Carr. These guys were AWESOME. I had “Virgin Teflon” delivered in less than 36 hours to my door. This is what we got:
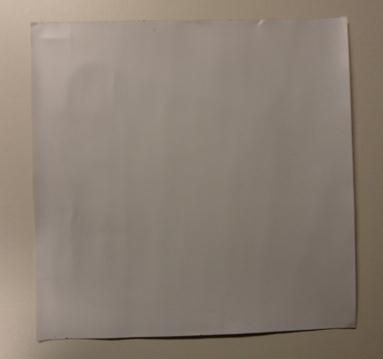
Figure 4: Teflon/PTFE Sheet, Front
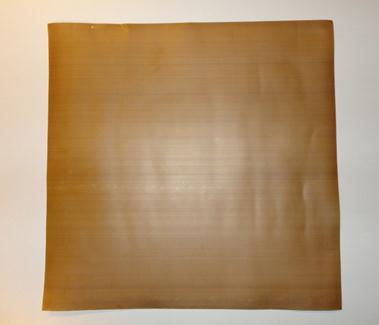
Figure 5: Teflon/PTFE Sheet, Adhesive-Ready Back
I ordered a 12″*12″ sheet of 0.020″ thick Teflon. A quick check with the calipers reveals the material is spot on and consistent. After tax and shipping I was all in for under 20 bucks. So far, this is looking better than spending $300 on a new focuser for a telescope that runs about $150. Let’s get fixin’!
First, I need to remove those nylon shims and rough up the inside of the housing, particularly where the shims once lived. This prepares the surface for glue and insures no bumps on the surface. I did not want to take any material from the housing as the wall thickness needs to remain consistent; I needed to be careful here. My Dremel wire brush on low speed and some hand sanding with steel wool did the trick nicely. Here’s the result:
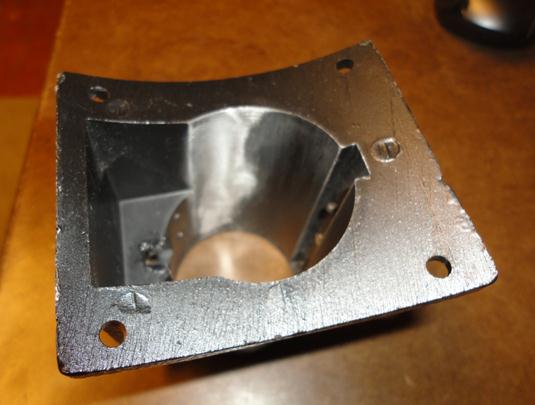
Figure 6: Focuser Housing, Prepped for Repair
Before I started sanding I masked off all of the channels and grooves with 3M Long-Mask tape. This is important as dust must NOT get embedded in the grease used on the gearing. Long-mask tape is designed to pull off without leaving any adhesive behind, even after sitting for a few months. I finished the roughing, cleaned out the dust and removed the tape. Now the fun begins. I cut a piece of the Teflon roughly to size for a test fit and to practice negotiating it into place. Once glue is in the works your fingers may not be nimble enough to position the material on the fly. Practice was definitely helpful here.
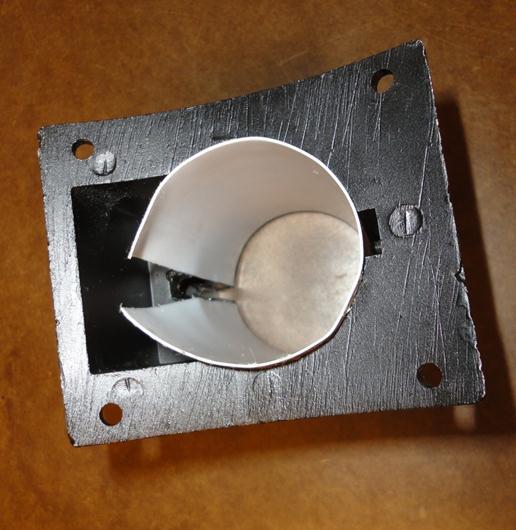
Figure 7: Teflon Inside Housing for Test-Fit
Notice the sizing of the Teflon sheet is not perfect. It is a little big, so it covers the interior completely but it is still small enough to avoid overlapping ends. Pi times diameter is your friend. I made a mistake in the first cut but I had enough material in the 12″*12″ sheet to cover this housing 5 times over. If you make a mistake, just cut another piece. Since the Teflon is roughly the right size, I pulled it out and applied spray glue to the adhesive-ready side of the Teflon and negotiated it into position. This was easy, really. I just rolled up the Teflon so the ends overlapped a little and was able to slide it in without contacting the housing walls. Once fully inserted, I popped the Teflon open with my fingers and pressed it against the housing wall. Don’t worry about glue on the Teflon side, we’ll clean that later.
Now we need to work fast for about 10 minutes.
The draw tube will not fit at this stage because we still need to trim the Teflon to the contours of the housing. Note there are two major grooves in the housing. The one on the left in these pictures is the slot for the rack and pinion gears. The dado on the right is for our focuser lock. The first cut needs to be on the left, to accommodate the rack. I whipped out the Exacto and trimmed just enough Teflon to allow the rack to pass through. For safety, I then inserted the draw tube to both test the fit and press the Teflon evenly around the housing while the glue firmed up. I let it set up for half an hour while I brewed and enjoyed some coffee (Colombian Supremo, fine grind), then came back to finish the trimming.
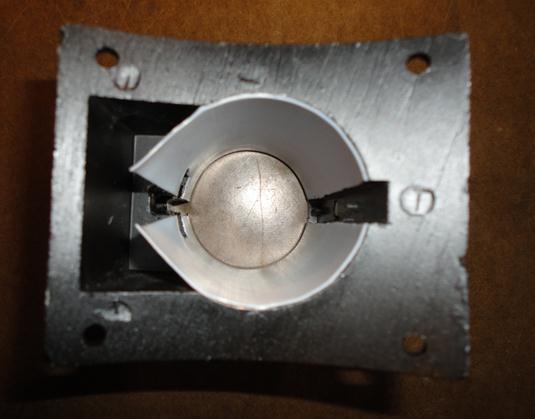
Figure 8: Teflon Glued In, Trimming 75% Complete
Figure 8 shows the Teflon about 75% trimmed in the housing. The loose bits on the left are all that remain. Negotiating the razor knife inside the housing was no trouble at all. I have special blades for wacky angles but I did not need them. Remember, Celestron used two half-inch wide nylon shims here so cutting away more material on accident is not a problem at all; you will still have 15 times more shim surface than your focuser started with. Also notice that my Teflon is now in two pieces. Finished, it looks like Celestron designed it that way. If only.
One last test fit with the draw tube tells the whole story. Without the pinion gear and spring to press on the rack and tube wall, the draw tube gently slides through the housing and will slide out (slowly) if I hold it vertically. This is perfect. I have no unneeded friction. How about the rock/play? Fully inserted, there is no rock at all. Fully extended, the draw tube moves less than 1mm laterally at the top. So far, this is success!
After carefully reassembling everything this solution works like a charm. I no longer have 2 nylon shims in my focuser, I have a Teflon bearing.
Fast forward 3 months:
The action is smooth night after night, the draw tube does not stick in the housing and I seem to have inherited some unanticipated benefits:
- The image no longer shifts when I lock the focuser in place
- I can adjust the tension on the rack and pinion more finely with those four screws now that the draw tube has more surface contact with the housing (well, with my Teflon, anyway). That means I can adjust the focus more finely without risking a runaway eyepiece.
- If the focuser expands and the action gets a little stiff, no worries. The Teflon simply will not stick. That, and the Teflon does compress by .001″ or so if there is sufficient pressure. My focuser is rock solid.
- The leftover Teflon makes for some awesome furniture foot pads!
In all, this was a major upgrade for me, not just a repair.
Some follow-up and opinion:
Celestron, I’m looking at you. I will reiterate that it was me, the owner, who abused the focuser by overloading it with gear. I am also well aware a rack and pinion focuser is pretty much the bottom of the barrel for the purpose I employ the scope but seriously…two nylon shims? What the heck? Yes, they’re cheap. Yes, they can be assembled by untrained workers in an anonymous factory somewhere. But you can do better. You make some ridiculously awesome gear. With the right tooling (which I already have in mind), this fix would cost no more than $0.50 per focuser to implement and it has already improved my satisfaction with the C6-N by leaps and bounds. Think about it. I hereby give you permission, nay, encourage you to use this modification in your future designs. All I ask in return is a nod, a shout-out, or maybe a 10″ Newt for my CG-5.
One has to dream, right?
Detailed Instructions:
First off, doing any of this is likely to void any warranty you have and may or may not solve your specific problem. While rack and pinion focusers are generally similar in design you might have a hangy bit here or pokey bit there that precludes this approach. Use your head and remember: this is a one-way street. Once you remove the factory shims they will probably be destroyed and your options will be limited. Second, while the rack and pinion is simple, you should already have some ability to turn a screwdriver and re-assemble the parts later. I therefore take no responsibility for you destroying your focuser. This guide assumes you are already past the point of living with the problem of rack and play.
Tips:
- Of all the things you need to succeed a set of calipers is the most crucial. Buy or borrow some but do not even begin unless you can get hold of this measurement tool. They’re under $20 at Harbor Freight.
- The grease is annoying but don’t lose or contaminate any of it, it’s important.
- If you are aggressive and really want a perfect fit, buy the Teflon a couple of thousandths of an inch thicker than you need. Teflon can be sanded down with ordinary sandpaper. Sure, it takes a while and you need to constantly measure with the calipers but perfection can be had with some elbow grease.
- If you aren’t aggressive and just want to go from horrible to passable, buy the Teflon as close to your required thickness as possible without going over. This is the simpler route.
- Did you screw it up? Start over. You’ll have plenty of material to try 3 or 4 times.
What you need:
- Calipers (dial calipers capable of measuring .001 inch or less)
- Teflon sheet at the required thickness, 2-3 times what you will actually use
- Small razor knife, thin handled
- Screwdrivers and a wrench for removing the focuser
- Long-mask tape (go with 3M, you will thank me)
- Spray glue
- Dust free containers for your parts
- 200+ grit sandpaper or 000 steel wool
Step-By-Step:
- Carefully remove the focuser from the scope. Don’t drop anything on the primary mirror!
- Disassemble the focuser starting with the 4 screws holding the pinion gear to the rack and immediately separate each piece in a dust free container. Don’t touch the grease or allow it to become contaminated in any way.
- Remove the draw tube from the housing.
- Use your calipers to measure the inside diameter (ID) of the housing and the outside diameter (OD) of the draw tube. Take many measurements (at least 4) and average them out. Measure the inside of the housing BELOW the entrance bead or lip to get an accurate reading. If you use the scope under the same temperature conditions night after night, warm or cool the tube and housing to that temperature before measuring for the best accuracy.
- Subtract the OD of the draw tube from the ID of the housing. Now divide by 2. E.g., if your housing ID is 1.600″ and your draw tube OD is 1.550″ the difference is 0.050″ (five hundredths). Dividing by 2 gets you to 0.025″ (2.5 hundredths). This (0.025″) is the maximum thickness of the Teflon shim you need.
-
Order some Teflon. A 12″*12″ sheet should work, but make sure it is-
- Adhesive-ready on the back side and…
- At least 3 times as much material as you need to cover the housing (Pi * ID” * Length” = Square Inches to Cover) and…
- No thicker than your calculation from step 5. Less is better than more.
- Using your long-mask tape, cover and seal off any grooves in the housing where grease is present or through which gears may pass.
- Carefully remove the original nylon shims and smooth out the area beneath them, removing burrs and glue without removing any of the housing material (aluminum or plastic). Fine grit sandpaper or 000 steel wool is perfect.
- Thoroughly clean out all of the dust from the housing. Compressed air works great. DO NOT use a painter’s tack cloth. You don’t want residue left behind.
- Remove your long-mask tape.
- Cut a piece of Teflon slightly longer than your housing barrel and a hair shorter than your housing’s inside circumference (Pi * Diameter is your friend).
-
Test fit the Teflon, sliding it in from the bottom and stopping flush with the bottom of your housing’s top bead or lip. This will mean the Teflon stops short of the top of the housing against the bead and will stick out of the bottom before trimming.
- The ends of your Teflon strip should line up with your housing’s rack groove or dado. This will make fitting and trimming easier later.
- If you are careful and trim the Teflon closer to its final length you can test fit the draw tube now, too. This is a good idea.
- Trim the Teflon as needed so it can be rolled up fitted in place with the least amount of dexterity. Re-test the fit.
- Apply spray glue to the adhesive-ready side of the Teflon, edge to edge.
- Insert the Teflon to the right depth (flush with the bottom edge of the housing “bead”) and press to the housing sidewalls with your fingers. Don’t worry about glue on the Teflon face. It will come off easily later.
-
With your razor knife, trim the excess Teflon away from the groove where the focuser rack will slide and insert the draw tube.
- Check the action. It should be smooth. The draw tube should want to slide out slowly if you hold it upright. If the draw tube sticks look for bubbles, overlaps (etc) and eliminate them.
- Leave the draw tube in place for 30 minutes to let the glue set.
- Remove the draw tube and carefully trim around all the inside and outside housing edges with your razor knife.
- Gently clean any glue or grease from the Teflon. It should rub off easily.
- Re-insert the draw tube, reassemble the focuser and attach to your scope.
- Collimate your scope like it got dropped from a moving truck. It just did.
Clear skies!
Thank you. This is exactly what I was looking for to fix my scope because of exactly the same reason. The long mask tape, would that be the blue painters’ tape ?
Yes, the blue “long mask” tape is also called “painter’s tape”. Buy brand name for best results (3M). It’s about $7 a roll but it has many uses once you’re done.
Clear Skies!
Cool. Just wanted to make sure because I already have a couple of rolls left over from painting my house.
Clear skies to you as well.
I just received my C6 Advanced telescope. This was a big purchase for me and I had to save up for it just to afford to buy it. I couldn’t believe the slop that was in my focuser and was ready to return it until I found your article. I was able to make the necessary repairs following your steps, and have been able to make the precise collimations necessary for the telescope to perform as it should. I think Celestron really does need to look into the design of the focuser, because for the price of this scope there really is no reason for such poor workmanship. saving a few pennies by placing plastic shims in the tube is just bad business. Thank you for your article and advice in helping people fix this problem. Now my telescope works like it should. I hope Celestron see this article and gives you the recognition you deserve for coming up with a solution. Clear sky’s to you.
Thanks for the feedback: just tell your friends. This is a simple solution and one that applies to any rack and pinion focuser. They all use the same crap build plan. While I have upgraded to a C9.25 SCT I still love the C6-N. It doesn’t give me a lot of magnification power but the F5 speed is just dreamy stuff when opening the aperture on nebulae. If you’re just coming into the hobby, speed matters when you don’t have the patience for drift alignment and all that jazz. That’s a fine scope; you’re going to love it.
I spelled skies wrong but I’m sure you know what i meant.
I did, and I would never dream of criticizing somebody’s spelling when they’re busy complementing the post.
good share, thank you
Why didnt you swap out the grease while you had it all disassembled?
At the time of dis-assembly, I thought it best to just stay inside my “zone of competence” and the grease wasn’t in there with me. I have no idea what kind of grease it is, how it breaks down or how to safely remove it. I certainly didn’t know with what to replace it, given that we’re talking about both metals and plastics. The grease performs a shimming function as well, masking looseness between the rack and the pinion gear. Mess with that, and you mess with the ability to focus. I thought it safer on this point to let it be, because the grease was not problematic, the “rock” was.
I was just looking at the post again for the first time in a year and wanted to follow-up to the comment on removing the grease:
The next time I open up the scope I will replace the plastic rack with a metal (stainless steel) rack and pinion gear set. I know a guy who can make one for me. Failing that, I’m sure I can buy one from a supply house. That will allow me to replace the thick grease with something lighter, like CV bearing or lithium grease, which are both easier to clean.
I just bought one of these. I was actually interested in the Celestron Advanced VX mount, which I plan on using with my 80ED, but I found a site that sold the mount with this Newt on top for the same price as the mount alone, and I figured, hey, I could use a second OTA with a bit more aperture.
I tried to collimate the scope last night and it was a disaster. The laser spot moves back and forth about a centimeter on the primary mirror with the slightest motion of the focuser knob. And you can feel the drawtube scraping against the side of the focuser. I didn’t expect a “free” telescope to include a focuser as nice as the Crayford on my $500 refractor, but this one is worse than a Wal-Mart telescope. (Speaking from experience.)
So I think I’ll try out this Teflon trick…
Where do you live? I have a whack of teflon left over and for the price of a stamp, you can have a slab big enough to fix that bad boy right up. Just shoot me a note at the peterkraatz at cox dot net address if you’re in the US and interested. Stamps start to get more expensive overseas.
Pingback: The Rack and Pinion Fix, Revisited | The Practical Polymath
Pingback: I am the Kinzua Kid | The Practical Polymath
Pingback: focuser slop
Wouldn’t the whiteness of the teflon cause unwanted reflections and scattering? I wonder if you can get black teflon.
No, since the PTFE is nowhere near the light path. It lies precisely outside the light path, insulated from it by 1/16″ of aluminum plated plastic (the focuser tube). If anything, I’d be worried about the focuser tube.
Doesn’t the PTFE get exposed as you draw the focuser out more? I can see the original nylon shims near the bottom of the draw tube. I’ve heard of a lot of people flocking the inside of their draw tubes. I’m not sure how much light it will reflect at night though.
At full extension, about 3/4 of an inch of the stuff is exposed, but worrying about reflection off the draw tube at that point is misplaced. Your focus is going to be a bigger issue as there is now less “meat” for the focuser tube walls to keep the thing stable and straight.
Not to mention the fact that we’re making the best of a very bad situation here. If you’re using a rack and pinion focuser, you’re probably not also using a mythically sensitive optical tube, where output would be noticeably affected by something like this. My F/5 Newt is too fast, bright and forgiving to care about that 3/4 of an inch of whiteness.
And yes, I’ve heard of people doing all sorts of nutty things to their scopes. I’m not using this model as a professional grad photography platform, so no issues here and no flocking, either.
Can you give me the size in millimeters/metric units, i live in germany and need to purchase the teflon locally ?
I presume you’re talking about the PTFE/Teflon sheets.
The measurements and calculations you’re looking for should be taken by you. The figures from my post are specific to the measurements I took while breaking down the telescope and would not be a good reference point for purchasing materials, even if you are using the exact same scope. Differences in manufacturing, even very small changes, will make for large variations when you’re talking about tolerances in the fractions of a millimeter.
Pingback: Play in the focusser tube - how to fix/eliminate
was thinking about fixing my focuser with some shims and this gave me the info I needed about method and material. Searching around I also dound the PTFE sheets are available in black as well if worried about white being too reflective when focuser is fully extended
oooh, do you have a part number or link?
Pingback: Focuser advice
Great article. I’m going to do this on my c8n.
Regarding grease. I presume they use the same black grease throughout. I’ve just refitted the gears in my cg5 mount after having been seriously abused by a previous owner.
I tried several types including lithium and nothing really worked until I stopped at my local garage who sold motor bike chain lube. This is very viscous, does not fly off even at high speed and operates at high temperature too. It comes in a spray can. It was perfect and the mount is now back in perfect condition. I imagine I can even take corners at high speed although this is not tested yet.
Sorry don’t remember the brand, but I’m sure any garage will have a similar one.
Steve.
I kept the original grease, mainly because I had no idea what was in that stuff and it clearly served a purpose for holding parts with very low manufacturing precision in place. I’m toying with the idea of re-casting the plastic rack and pinion gears in aluminum using the home forge, or even hitting up a friend with a machine shop to carve new ones out of raw brass stock.
When I rebuilt the CG-5 head I used “Super Lube”, a synthetic grease with PTFE (Teflon). It helped a LOT.
Pingback: Newbie lookinor advice Re Meade 390 and Celestron Omni XLT 102
Very good information, thanks for sharing. I have a Celestron 70 mm Travelscope which I use as a guidescope with very good results, I need to replace the focuser drawtube as the rack now is very worn at the ends. Do you know were can a purchase a replacement? it is 1.5″ diameter and 5″ long. If metal, it would be great.
Peter, if you’re going to have a rack and pinion made up, and you are REALLY worried about backlash in the R&P, there are a multitude of simple ways to make zero backlash gears, like splitting the gear in half width wise, and rotationally springing one side against the other, with more spring force than max drive force this will truly be zero backlash, no grease-glue needed. Kind of overkill, but it would work really nicely.
That worked amazingly well, thank you!
Great article! Very well detailed….I had the exact same issue and went one step further and instead of Teflon tape, I used the “cloth side” of a 4 in x 2 in piece of adhesive Velcro. I have photos if you’d like for me to send them to you. I agree that the “slop” on the rack and pinion focuser is horrible! Especially if you’re using a 3X Barlow and a camera mount. No wonder I was always losing the objective, because with the added weight of the eyepieces and the mount the entire focusing tube would “drift” in one direction.
Fiddling with my old rv6 and the fovocuser is a weak link. As for grease I’m not unhappy with high temp silicone grease, from the plumbing department. Its clean and water proof and quite viscous. Love the teflon idea. But hate to wait. Tonight I’m going to use a slice of foil tape along the length of the tube. I’ve used it to snug up wiggly spots in the mount. Cheap and effective so far.
I’ve had my Astro-Tech AT115EDT for over a year and just discovered the focus tube has sloppy spots along the length of the rack and pinion, the brass rack is poorly machined with portions thick and thin so the pinion is snug and loose along the travel. Your description and resolution to Focuser Slop has been very helpful to learn more about this end of the OTA, a big Thanks. !!
I’m really glad this bit of home brew repair work is still useful after all this time!